Wednesday, February 29, 2012

New Driveway - Pictures

Here are some pictures of the new driveway completed by Duffy Willard Paving. We made the driveway slightly wider to accomodate two cars side by side, and we made it shorter to make the usable sideyard space larger. In terms of driveway length, we left a few extra feet of wiggle room behind where cars will park so that any snow being plowed from the street will not hit a car parked in the driveway.

Making a shorter driveway has not only made the usable (and sunny, for those gardeners out there) part of the yard larger; It has also improved the view of the yard from the porch. Now, if you are sitting on the porch, you will actually be overlooking your yard, not just a big driveway. Take a peek:


Don't try this at home folks


So there's our smaller driveway. In addition to the functional benefits, there are environmental benefits to minimizing paved area as well. For one, it helps reduce urban heat island effects (see link for more info). And, importantly, it helps improve water quality (in this case, in the Connecticut River, where our stormwater runs) by reducing the amount of runoff that goes to storm drains, as well as the associated contaminants that are carried by runoff (sediment, nutrients, nasty stuff from cars, etc.). And of course, again for the gardeners out there, less pavement in the sunny part of the yard now means you've got some extra space to grow your "farden" (farm-garden) and produce more of your food right at home!

Sunday, February 26, 2012

Rough Drywall Pictures (November)

Here are some pictures of the rough drywall work (taken in early November):


In the tub and shower areas, cement board is used instead of drywall. The great value of cement board is that it does not rot, warp, grow mold, or deteriorate when subjected to water. Here are some pictures of the cement board installed in the downtairs bathroom tub and shower area:


There's a Box in The Basement, Dear Liza, Dear Liza

There's a box in the the basement, dear Liza, a box...
With what should we build it, dear Henry, dear Henry
With what should we build it, dear Henry, with what?

We had some fun with this one. The boiler, hot water tank, washer and dryer needed to be located within the thermal envelope (the heated space within the house). The reason is two-fold: 1) any waste heat generated from these devices should contribute to the heat already required to condition the house, and 2) the difference in temperature between the device and its surroundings should be small, reducing the heat transfer (heat loss) to the surroundings. Upshot: placing hot water devices in the thermal envelope improves energy efficiency.

So what's the problem? We wanted to conserve as much of the usable space in the house as possible. We generated numerous floor plans with different versions of bathroom, laundry and heating equipment locations. With recent advances, boilers are actually incredibly quiet and compact, making placement inside the home a reasonable option. That said, we didn't want to take up more livable space than we had to...yet we also didn't want folks to have to go to the basement to do their laundry.

So... in the end, the boiler and hot water tank went to the basement and the washer/dryer were stacked in the bathroom on the first floor. If the homeowner wants to in the future, the washer/dryer could be moved down to the basement should the basement ever be finished into a livable space. In the homeowner's manual we will actually be including a section to talk about our recommendations for any future expansion of the thermal envelope into the basement, including wall placement.

Now, with the boiler and hot water tank in the basement, we needed to get them into the thermal envelope (connected to the heated space on the first floor). So we built a box to house these and any future hot water systems. I must admit, Henry thought we were a little crazy when we gave him the specs for this one. While we had a good sense of the insulation requirements for this box, we were less familiar with standard practices...because this was not a standard practice! We spent some time getting great advice from CET on the type of insulation to use (rigid, fiberglass batt, etc), the methods of applying it (between polywood, exposed...) and joining it (seams and caulking). Because of the uneven nature of the original basement earthen floor, Henry's crew used a post and beam structure with a full floor for the box and then located it at the edge of the foundation under the kitchen to minimize pipe lengths (also an energy efficiency consideration).

The first time we saw it complete, one of Henry's guys had a huge smile on his face and said, "Did you see the bomb shelter? That thing's tight!" Ha! Take a look:


Thursday, February 23, 2012

Tree Removal Pictures

So here's "the new normal" - the backyard without the large tree that stood next to the coop. Thankfully, there are two other mature trees remaining, giving plenty of shade to the back of the yard.


And here's what remains of the stump (to be removed, of course):


After taking the tree down, Henry cut it into small pieces and found a guy who heats his home with wood to take all of this:


Door Color Take 1, Door Color Take 2

So we painted the door....


But we didn't like it. So we painted it again:
Ahhh, that's better....

(Oh, and this is an Energy Star Certified Pella door....)

Wall Framing Pictures - LEED Points

There is a LEED for Homes point that can be earned for efficient use of materials if a project employs wall stud spacing of 16" on center (o.c.) or greater. We decided to space our wall studs at 24" o.c. where we could, and in the end, the stud spacing ranged between 16" and 24" o.c. depending on layout and and structural constraints. We are also going for a half a point for using Forest Stewardship Council (FSC) Certified interior wall framing studs. For those who are interested, here's some information on the forest management criteria for FSC Certified forests and their wood: www.fscus.org/standards_criteria/


Wall Stud Spacing Measurements:


FSC Certification Stamps on Wall Studs:


Waste Management Housekeeping (Pictures)


Throughout the project, waste management has very much been a regular housekeeping effort. Here are some more pictures of materials that were salvaged for reuse or recycling....or that had to be landfilled...

Curbside Alert! (This was gone in a day!)


Cardboard and container recycling bins


On the green bag you can see our
revolving
"clean wood" pile for recycling


Cardboard recycling overflow!


Clean wood recycling

 
The metal recycling pile (mostly from
the demolition work) was a hot item.
Local people who recover scrap metal
wee quick to pick up whatever we had...


Quite a bit of demolition waste ended up
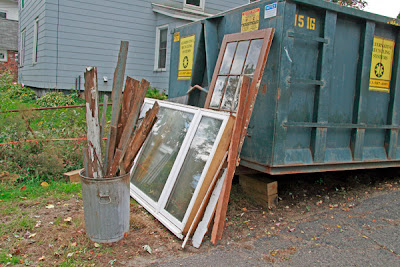
going to the landfill of course. The door
you see here got taken, but the three
panel window did not. It turned out
it wasn't a true double paned window
(it was a single paned window with
a storm window), so there wasn't
a lot of interest in it....


A scrap metal recycler
removed this for us....

More cardboard recycling


Tuesday, February 21, 2012

More Roofing Pictures

Here are some more pictures of the roofing and related waterproofing work that was completed in October...

To qualify as Energy Star Certified shingles, the Certainteed Landmark Silver Birch shingles we selected had to meet the solar reflectance and reliability specifications of the federal Energy Star program. Shingles that reflect more light keep the roof surface cooler, which in turn helps keep the home cool in the summer (less heat is transmitted into the home from the roof). And there's another environmental beneift as well: Lighter colored shingles also help to minimize urban heat island effects. 

(For the energy geeks out there, the Certainteed Landmark Silver Birch shingles have an initial Solar Reflectance of .26 and a Solar Reflectance after three years of .28)

Several rows of siding above the roof
were removed to redo the waterproofing


Underlayment


Installing flashing around vent


Installing flashing and replacing
rotted siding


Energy Star Certified asphalt shingles